DIY Golf Simulator Shed Plans That Fit Any Backyard and Budget
Imagine stepping into your backyard shed and instantly being transported to Pebble Beach, St. Andrews, or any world-class golf course. With the right DIY golf simulator shed plans, this dream can become reality for less than the cost of a year’s country club membership. As golf simulator technology becomes more affordable and accessible in 2025, savvy golf enthusiasts are discovering that building a dedicated simulator shed offers the perfect blend of convenience, privacy, and year-round practice opportunities.
Whether you’re working with a compact urban backyard or sprawling suburban property, there’s a DIY golf simulator shed solution that fits both your space and budget. From simple 8×12 structures under $3,000 to elaborate 16×20 custom builds, the possibilities are endless for creating your personal golf paradise.
Key Takeaways
- Budget-friendly options start at $2,500 for basic 8×12 sheds with essential golf simulator features
- Minimum space requirements are just 10 feet wide, 12 feet deep, and 9 feet high for most golf simulators
- DIY construction can save 40-60% compared to hiring contractors for shed building
- Multi-purpose designs maximize value by serving as storage, workshop, or entertainment space
- Proper planning and permits are essential before breaking ground on any shed project
Understanding Golf Simulator Space Requirements
Before diving into specific shed plans, it’s crucial to understand the minimum space requirements for a functional golf simulator setup. Most golf simulators need at least 10 feet of width, 12 feet of depth, and 9 feet of ceiling height to accommodate a full golf swing safely.
Essential Measurements for Golf Simulator Sheds
The ideal golf simulator shed provides comfortable swing space while maintaining safety margins. Here are the key dimensions to consider:
Minimum Requirements:
- Width: 10 feet (allows for side-to-side movement)
- Depth: 12 feet (6 feet behind golfer, 6 feet to screen)
- Height: 9 feet (accommodates full driver swing)
Recommended Dimensions:
- Width: 12-14 feet (more comfortable movement)
- Depth: 14-16 feet (better ball flight tracking)
- Height: 10-12 feet (prevents ceiling strikes)
Additional Space Considerations
Beyond the basic swing area, factor in space for:
- Equipment storage (clubs, balls, accessories)
- Seating area for spectators or relaxation
- Computer/control station for simulator operation
- HVAC equipment for climate control
- Electrical panels and wiring access
Budget-Friendly Shed Plans Under $5,000
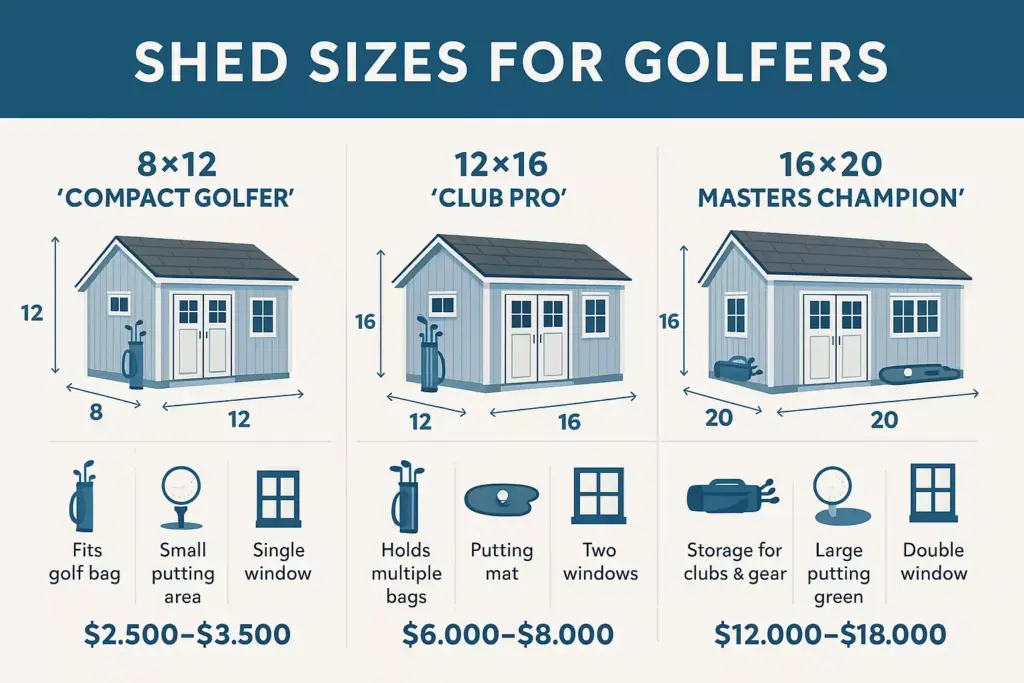
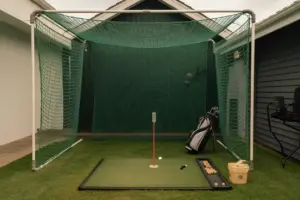
The Compact Golfer (8×12 Basic Shed) – $2,500-$3,500
This entry-level option proves that effective golf simulators don’t require massive budgets. The 8×12 Compact Golfer design maximizes every square foot while keeping costs minimal.
Materials List:
- Pressure-treated lumber for framing
- OSB sheathing for walls and roof
- Asphalt shingles for roofing
- Basic electrical package (outlets, lighting)
- Insulation for year-round use
Key Features:
- 96 square feet of interior space
- 10-foot ceiling height accommodates most swings
- Single door entry keeps costs down
- Two windows for natural light and ventilation
- Basic electrical for simulator and lighting
Construction Timeline: 2-3 weekends for experienced DIYers
The Weekend Warrior (10×14 Enhanced Shed) – $3,500-$4,500
Stepping up in both size and features, the Weekend Warrior offers significantly more comfort without breaking the $5,000 barrier.
Enhanced Features:
- 140 square feet of interior space
- Additional storage area for golf equipment
- Improved insulation package for better climate control
- Upgraded electrical with dedicated circuits
- Double door entry for easier equipment access
Smart Cost-Saving Tips:
- Use metal roofing instead of shingles for longevity
- Install LED lighting to reduce electrical load
- Choose vinyl siding for low maintenance
- Add DIY concrete pad instead of hiring contractors
Mid-Range Shed Designs ($5,000-$10,000)
The Club Pro (12×16 Deluxe Shed) – $6,000-$8,000
The Club Pro design represents the sweet spot between affordability and luxury, offering professional-grade features at a reasonable price point.
Premium Features:
- 192 square feet of spacious interior
- 12-foot ceiling height for unrestricted swings
- Climate control ready with HVAC rough-in
- Dedicated equipment storage with built-in shelving
- Observation area with bench seating
Construction Upgrades:
- 2×6 wall framing for superior insulation
- Engineered roof trusses for open ceiling design
- Vinyl windows with screens for ventilation
- Composite decking for entrance area
- Underground electrical for clean appearance
The Country Club (14×18 Premium Shed) – $8,000-$10,000
For golfers seeking near-commercial quality in their backyard simulator, the Country Club design delivers exceptional value.
Luxury Amenities:
- 252 square feet of premium space
- Separate equipment room for storage and controls
- Full HVAC system for year-round comfort
- Upgraded electrical package with 100-amp service
- Professional-grade insulation for sound dampening
Luxury Shed Plans ($10,000+)

The Masters Champion (16×20 Ultimate Shed) – $12,000-$18,000
The Masters Champion represents the pinnacle of DIY golf simulator sheds, incorporating every conceivable luxury while maintaining DIY feasibility.
Championship Features:
- 320 square feet of expansive interior
- Cathedral ceiling with exposed beams
- Separate lounge area with mini-fridge space
- Professional lighting package with dimmer controls
- Sound system rough-in for immersive experience
Premium Construction Details:
- Concrete foundation with radiant heat option
- Spray foam insulation for maximum efficiency
- Commercial-grade electrical with surge protection
- Custom millwork for equipment storage
- Architectural shingles with extended warranty
🏌️ Golf Simulator Shed Cost Calculator
Essential Construction Considerations
Foundation Options and Requirements
The foundation represents one of the most critical decisions in golf simulator shed construction. Proper foundation selection affects both cost and long-term performance of your simulator setup.
Gravel Pad Foundation ($3-5 per sq ft)
- Most economical option for smaller sheds
- Adequate for basic simulator setups
- Requires proper drainage and compaction
- May shift over time in freeze-thaw climates
Concrete Slab Foundation ($8-12 per sq ft)
- Provides stable, level surface for equipment
- Excellent for larger, permanent installations
- Allows for in-floor heating systems
- Requires professional concrete work in most areas
Deck Foundation ($12-18 per sq ft)
- Ideal for sloped or challenging terrain
- Provides excellent ventilation underneath
- Easier to run utilities through floor
- Higher cost but maximum flexibility
Electrical Requirements for Golf Simulators
Modern golf simulators require substantial electrical capacity to power projectors, computers, lighting, and climate control systems.
Minimum Electrical Requirements:
- 20-amp dedicated circuit for simulator equipment
- 15-amp circuit for general lighting and outlets
- GFCI protection for all outlets
- Surge protection for expensive electronics
Recommended Electrical Upgrades:
- 100-amp subpanel for larger sheds with HVAC
- Dedicated circuits for each major component
- Smart switches for lighting control
- USB charging stations for mobile devices
Insulation and Climate Control
Year-round golf simulator use demands proper insulation and climate control to maintain comfortable conditions and protect expensive equipment.
Insulation Recommendations:
- R-15 minimum in walls for basic comfort
- R-30 or higher in ceiling for energy efficiency
- Vapor barrier to prevent moisture issues
- Sound dampening materials for neighbor consideration
HVAC Considerations:
- Mini-split systems offer efficient heating and cooling
- Ventilation fans prevent humidity buildup
- Programmable thermostats optimize energy usage
- Air filtration protects sensitive electronics
Step-by-Step Construction Guide
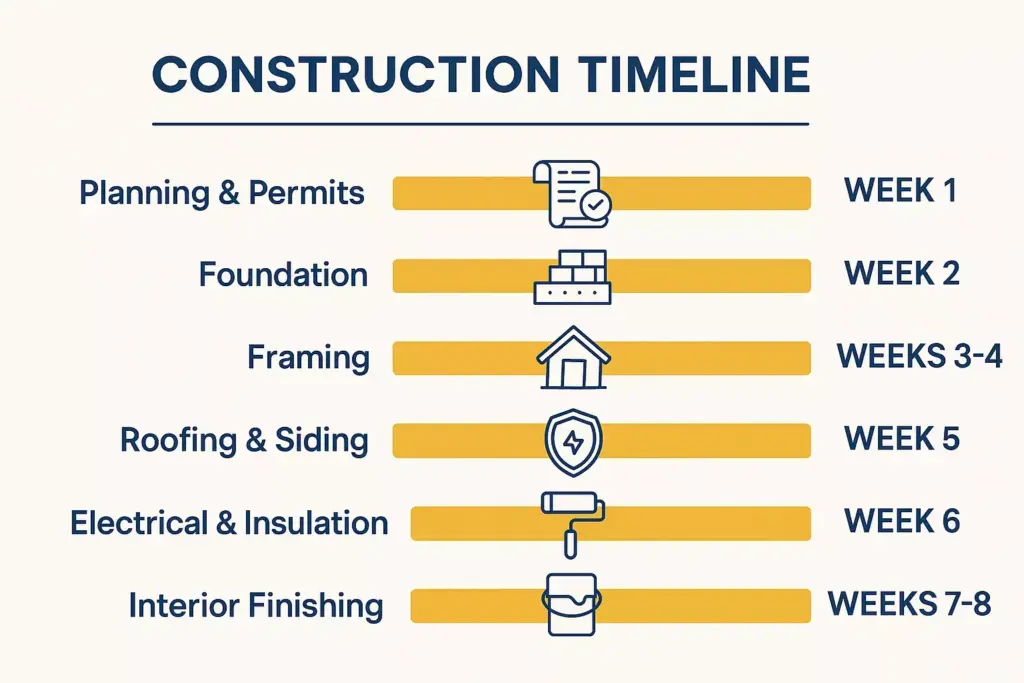
Phase 1: Planning and Permits (Week 1)
Before breaking ground, thorough planning prevents costly mistakes and ensures compliance with local building codes.
Essential Planning Steps:
- Check local zoning requirements and setback rules
- Obtain necessary building permits (typically $100-500)
- Call utility marking services before excavation
- Order materials with 10% overage for waste
- Arrange tool rentals for specialized equipment
Phase 2: Site Preparation and Foundation (Week 2)
Proper site preparation sets the stage for professional-quality results throughout the construction process.
Site Preparation Checklist:
- Clear vegetation and level building area
- Excavate to proper depth for chosen foundation
- Install drainage if required by local codes
- Compact base materials for stability
- Set foundation forms or prepare gravel base
Phase 3: Framing and Structure (Weeks 3-4)
The framing phase transforms raw materials into recognizable structure and requires careful attention to square, level, and plumb.
Framing Sequence:
- Install sill plates on foundation
- Frame walls on ground, then raise
- Install roof trusses or rafters
- Add sheathing to walls and roof
- Install house wrap for weather protection
Phase 4: Roofing and Siding (Week 5)
Weather protection takes priority once the structure is framed and sheathed.
Exterior Finishing Steps:
- Install roofing underlayment and shingles
- Add gutters and downspouts for drainage
- Install windows and doors for security
- Apply siding according to manufacturer instructions
- Caulk and weatherseal all penetrations
Phase 5: Electrical and Insulation (Week 6)
Professional electrical work ensures safety and code compliance for your golf simulator installation.
Electrical Installation Process:
- Run electrical service from main panel
- Install outlet and switch boxes per plan
- Pull wiring through walls and ceiling
- Connect devices and test circuits
- Schedule electrical inspection before closing walls
Phase 6: Interior Finishing (Weeks 7-8)
The final phase transforms raw interior space into comfortable golf simulator environment.
Interior Finishing Sequence:
- Install insulation in walls and ceiling
- Hang and finish drywall for clean appearance
- Paint walls and ceiling in appropriate colors
- Install flooring suitable for golf activities
- Add trim and final details for professional look
Maximizing Your Golf Simulator Shed Investment
Multi-Purpose Design Strategies
Smart design choices maximize utility beyond golf simulation, creating valuable multipurpose space for the entire family.
Versatile Features to Consider:
- Removable golf equipment allows other activities
- Built-in storage serves multiple purposes
- Fold-down workbench for hobby projects
- Entertainment center for family movie nights
- Exercise area for fitness equipment
Technology Integration Tips
Modern golf simulators benefit from integrated technology that enhances the user experience and adds convenience.
Smart Technology Additions:
- Automated lighting systems that respond to occupancy
- Climate control integration with smartphone apps
- Sound system wiring for immersive audio
- Network connectivity for online play and updates
- Security cameras for equipment protection
Maintenance and Longevity
Proper maintenance protects your investment and ensures years of reliable golf simulation enjoyment.
Annual Maintenance Tasks:
- Inspect roof and gutters for damage or clogs
- Check electrical connections for corrosion or looseness
- Service HVAC systems according to manufacturer recommendations
- Touch up paint and caulking as needed
- Clean and organize equipment storage areas
Common Mistakes to Avoid
Undersizing the Structure
The most common regret among DIY golf simulator builders is not building large enough initially. Adding space later costs significantly more than building it right the first time.
Size-Related Pitfalls:
- Insufficient swing clearance creates safety hazards
- Cramped equipment storage leads to damage and inconvenience
- No spectator space limits social aspects of golf simulation
- Inadequate ceiling height restricts club selection
Skimping on Electrical Infrastructure
Inadequate electrical planning creates ongoing frustration and limits future upgrade possibilities.
Electrical Mistakes to Avoid:
- Insufficient circuit capacity for equipment demands
- Poor surge protection risks expensive equipment damage
- Inadequate outlet placement requires extension cords
- No provisions for future upgrades limits expansion options
Ignoring Local Building Codes
Building code violations can be expensive to correct and may affect property insurance or resale value.
Code Compliance Issues:
- Setback violations may require structure relocation
- Electrical work without permits creates safety and legal issues
- Inadequate foundation may not meet local frost requirements
- Missing inspections can complicate future permits
Cost-Saving Strategies
Material Sourcing Tips
Strategic material purchasing can reduce costs by 20-30% without compromising quality or safety.
Money-Saving Approaches:
- Buy lumber in bulk during off-season periods
- Source reclaimed materials for rustic aesthetic
- Compare prices across multiple suppliers
- Time purchases around seasonal sales events
- Consider alternative materials that offer similar performance
DIY vs. Professional Services
Knowing when to DIY and when to hire professionals optimizes both cost and quality outcomes.
Best DIY Tasks:
- General carpentry and framing work
- Painting and finishing tasks
- Basic electrical (with proper permits)
- Landscaping and site preparation
Consider Professional Help For:
- Foundation work requiring heavy equipment
- Complex electrical installations
- HVAC system installation and commissioning
- Roofing work on steep or complex designs
Conclusion
Building a DIY golf simulator shed represents an exceptional opportunity to create a personalized golf experience while adding significant value to your property. Whether you choose a budget-friendly 8×12 basic design or invest in a luxury 16×20 ultimate setup, the key to success lies in thorough planning, quality construction, and attention to detail.
The projects outlined in this guide prove that professional-quality golf simulator sheds are achievable for DIY builders across all skill levels and budgets. From the $2,500 Compact Golfer to the $18,000 Masters Champion, each design offers unique advantages while maintaining the core functionality that makes golf simulation so appealing.
Your next steps should include:
- Measuring your available space and determining optimal shed dimensions
- Setting a realistic budget that includes a 15-20% contingency for unexpected costs
- Researching local building codes and permit requirements in your area
- Creating a detailed timeline that accounts for weather, material delivery, and inspection schedules
- Gathering the necessary tools and equipment for safe, efficient construction
Remember that building a golf simulator shed is not just about creating space for golf practice—it’s about investing in your passion, improving your game, and creating lasting memories with family and friends. The satisfaction of stepping into a structure you built with your own hands, combined with the convenience of year-round golf access, makes this project one of the most rewarding DIY endeavors any golf enthusiast can undertake.
Start planning your dream golf simulator shed today, and transform your backyard into the ultimate golf destination that fits both your space and budget perfectly.