Build Your Own DIY Golf Simulator Enclosure That Looks and Feels Professional
Imagine transforming your basement, garage, or spare room into a professional-grade golf simulator that rivals expensive commercial setups. With the right materials, tools, and know-how, building a DIY golf simulator enclosure isn’t just possible—it’s surprisingly affordable and rewarding. Whether you’re a weekend warrior looking to improve your swing or a serious golfer wanting year-round practice, creating your own simulator space can save thousands while delivering professional results.
Key Takeaways
Disclosure: This post contains affiliate links. As an Amazon Associate, we earn from qualifying purchases, and at no extra cost to you.
- Budget-friendly approach: Building your own enclosure costs 60-70% less than purchasing pre-made professional systems
- Customizable design: DIY enclosures can be tailored to fit any space and accommodate specific room dimensions
- Professional quality: With proper materials and construction techniques, homemade enclosures perform as well as commercial alternatives
- Essential components: Focus on impact screens, proper framing, adequate lighting, and sound dampening for best results
- Safety first: Proper construction ensures ball containment and protects both equipment and users
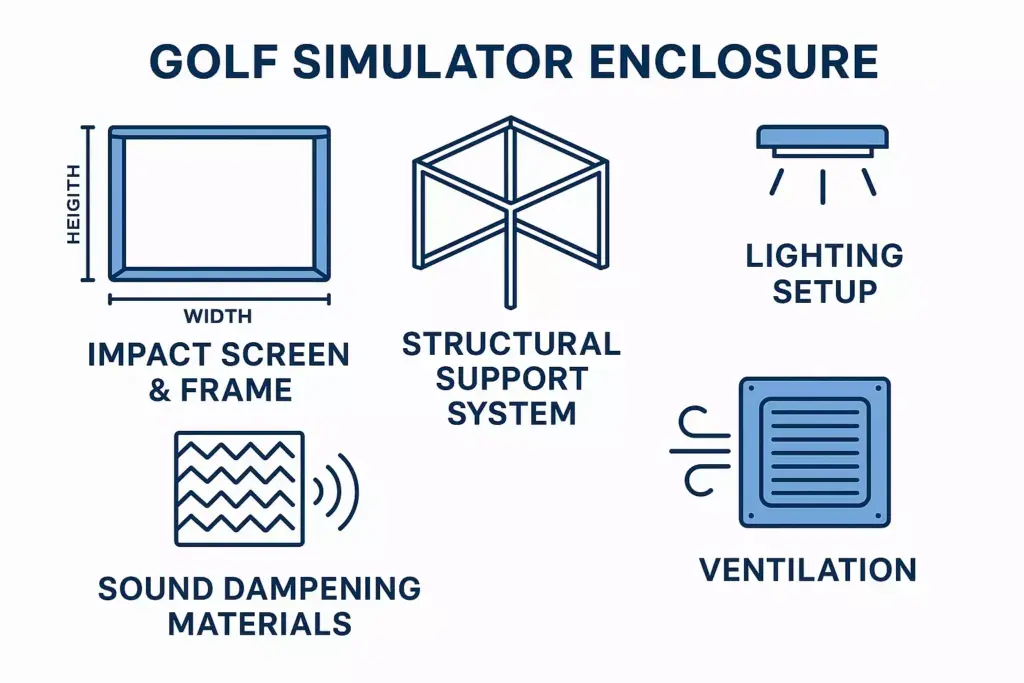
Understanding Golf Simulator Enclosure Basics
A golf simulator enclosure serves multiple critical functions beyond simply containing golf balls. The structure must absorb impact energy, provide a smooth projection surface, eliminate ambient light interference, and create an immersive playing environment.
Core Components of Professional Enclosures
Impact Screen and Frame
The impact screen represents the most crucial element of any simulator setup. Professional-grade screens must withstand repeated ball impacts while maintaining optical clarity for projection systems. The frame supporting this screen requires engineering to distribute impact forces evenly.
Structural Support System
Unlike temporary setups, professional enclosures feature robust framing that can handle high-speed ball impacts without movement or vibration. This stability ensures consistent performance and extends equipment lifespan.
Environmental Controls
Professional enclosures incorporate lighting management, sound dampening, and climate considerations to create optimal playing conditions regardless of external factors.
Planning Your DIY Golf Simulator Space
Space Requirements and Measurements
Minimum Dimensions
- Width: 12-14 feet minimum (16 feet preferred)
- Depth: 16-18 feet minimum (20 feet preferred)
- Height: 9-10 feet minimum (12 feet preferred)
Critical Measurements
The distance from hitting area to screen should be 8-12 feet for most launch monitors. Ceiling height affects club selection and swing comfort, with 10+ feet allowing full driver swings for most golfers.
Room Selection Considerations
Basement Advantages
✅ Naturally enclosed space
✅ Minimal noise transmission
✅ Consistent temperature
✅ Often unused square footage
Garage Benefits
✅ High ceilings
✅ Easy equipment access
✅ Concrete floors (ideal for hitting mats)
✅ Ventilation options
Spare Room Potential
✅ Climate controlled
✅ Finished surfaces
✅ Electrical access
✅ Sound insulation
Essential Materials and Tools
Framing Materials
| Material | Purpose | Quantity Needed | Estimated Cost |
|---|---|---|---|
| 2×4 Lumber | Main frame structure | 20-25 pieces | $150-200 |
| 2×6 Lumber | Heavy-duty support beams | 8-10 pieces | $120-160 |
| Metal Brackets | Joint reinforcement | 16-20 pieces | $40-60 |
| Carriage Bolts | Secure connections | 2 lbs | $25-35 |
| Wood Screws | General assembly | 5 lbs | $30-40 |
Screen and Projection Materials
Impact Screen Options
- Carl’s Place DIY Kit: $300-500 (excellent value)
- Professional vinyl: $200-400 (requires more setup)
- Commercial impact screen: $600-1200 (premium option)
Projection Surface Preparation
The screen surface requires specific treatments to optimize image quality while maintaining durability. Goo Systems or similar projection paints can enhance basic materials, while specialized impact screen materials come pre-treated.
Tools Required
Essential Power Tools 🔧
- Circular saw or miter saw
- Power drill with bits
- Impact driver
- Level (4-foot minimum)
- Stud finder
Hand Tools
- Measuring tape (25-foot)
- Square
- Chalk line
- Safety glasses
- Work gloves
Step-by-Step Construction Process
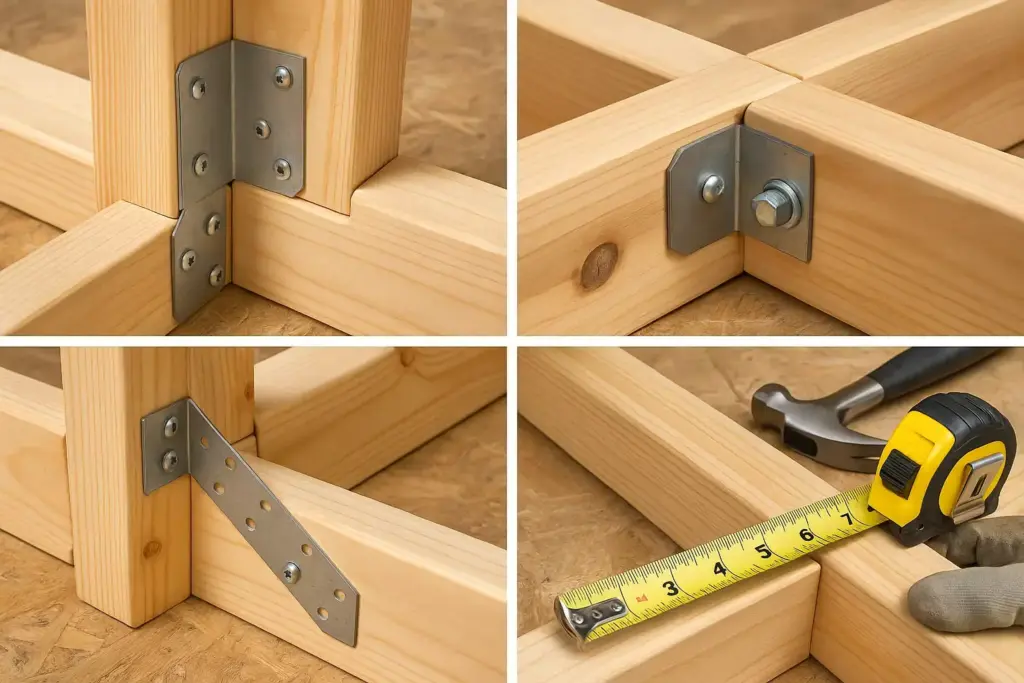
Phase 1: Frame Construction
Foundation and Base Frame
Start with a rectangular base frame using 2×6 lumber for maximum stability. This foundation anchors the entire structure and must be perfectly level and square.
- Measure and cut base pieces to room dimensions
- Join corners using carriage bolts and metal brackets
- Check diagonal measurements to ensure square construction
- Level the base frame using shims if necessary
Vertical Support Installation
Vertical supports bear the impact load and must be properly spaced and secured.
- Install corner posts using 2×4 lumber
- Add intermediate supports every 4-6 feet
- Brace all verticals with temporary supports during construction
- Double-check plumb and level throughout process
Phase 2: Impact Screen Installation
Screen Mounting System
Professional installations use tensioning systems to maintain proper screen tautness and eliminate wrinkles that affect ball bounce and image quality.
Mounting Hardware
- Heavy-duty grommets every 12 inches
- Bungee cord or spring tensioning system
- Reinforced mounting points on frame
- Quick-release system for screen replacement
Installation Process
- Mark grommet locations on screen material
- Install grommets using professional grommet tool
- Attach tensioning hardware to frame
- Mount screen starting from top center and working outward
- Adjust tension for optimal tautness without over-stretching
Phase 3: Structural Reinforcement
Impact Distribution
Golf balls create significant impact forces that must be distributed across the frame structure rather than concentrated at impact points.
Reinforcement Techniques
- Cross-bracing between vertical supports
- Backing boards behind impact screen
- Shock-absorbing materials to reduce vibration
- Foundation anchoring to prevent movement
Professional Finishing Touches
Lighting Design
Optimal Lighting Setup
Proper lighting eliminates shadows while preventing projection interference. LED strip lighting provides even illumination without heat buildup.
Lighting Placement Strategy
- Overhead lighting behind golfer position
- Side lighting to eliminate swing shadows
- Ambient lighting for overall visibility
- Projection area darkness to maintain image contrast
Sound Management
Acoustic Considerations
Ball impacts create significant noise that can disturb others and detract from the experience. Sound dampening materials improve both acoustics and neighbor relations.
Sound Control Methods
- Foam panels on walls and ceiling
- Heavy curtains around enclosure
- Carpet or rubber flooring to reduce impact noise
- Isolation mounts for equipment
Ventilation and Climate Control
Air Circulation
Extended practice sessions generate heat and humidity that can affect comfort and equipment performance.
Ventilation Solutions
- Exhaust fans for air movement
- Dehumidifier in humid climates
- Space heater for cold environments
- Air conditioning for hot climates
Advanced Features and Upgrades
Automated Ball Return Systems
DIY Ball Return Options
- Gravity-fed chutes using PVC pipe
- Angled floor sections to direct balls
- Collection nets with manual retrieval
- Motorized systems for full automation
Multi-Sport Capabilities
Expandable Design Features
- Removable side panels for other sports
- Adjustable screen height for different activities
- Modular construction for easy reconfiguration
- Equipment storage integration
Technology Integration
Smart Features
- Automated lighting with motion sensors
- Climate control integration
- Sound system installation
- Equipment charging stations
Safety Considerations and Best Practices
Structural Safety
Load-Bearing Requirements
The enclosure must withstand repeated high-energy impacts without structural failure or degradation.
Safety Checklist ✅
- All joints properly fastened and reinforced
- Frame anchored to prevent tipping
- Screen tensioning within safe limits
- Emergency exit access maintained
- Electrical components properly installed
Operational Safety
User Protection
- Clear swing zones marked and maintained
- Equipment inspection protocols
- Proper club selection for space limitations
- Safety equipment readily available
Maintenance and Longevity

Regular Maintenance Tasks
Monthly Inspections
- Screen tension and wear assessment
- Frame stability and joint tightness
- Lighting function and bulb replacement
- Equipment calibration verification
Seasonal Maintenance
- Deep cleaning of all surfaces
- Hardware inspection and replacement
- Climate control system servicing
- Technology updates and calibration
Replacement and Upgrade Planning
Component Lifespan Expectations
- Impact screens: 2-5 years depending on usage
- Structural frame: 10+ years with proper maintenance
- Technology components: 3-7 years
- Lighting systems: 5-10 years with LED technology
Cost Analysis and Budget Planning
DIY vs Commercial Comparison
Commercial Enclosure Costs
- Basic commercial units: $8,000-15,000
- Premium systems: $15,000-25,000
- Professional installations: $25,000-50,000+
DIY Cost Breakdown
- Basic DIY build: $1,500-3,000
- Enhanced DIY setup: $3,000-5,000
- Professional-grade DIY: $5,000-8,000
Return on Investment
Long-term Value Analysis
Building your own enclosure provides immediate cost savings of $5,000-15,000 compared to commercial alternatives. Additionally, the customization possibilities and upgrade flexibility add long-term value that pre-built systems cannot match.
Skill Development Benefits
The construction process develops valuable skills in carpentry, electrical work, and project management while creating a deeper understanding of the system’s operation and maintenance requirements.
Troubleshooting Common Issues
Structural Problems
Frame Movement or Vibration
- Cause: Insufficient anchoring or weak joints
- Solution: Add diagonal bracing and anchor points
- Prevention: Use proper fasteners and check level regularly
Screen Sagging or Wrinkling
- Cause: Improper tension or mounting
- Solution: Adjust tensioning system and redistribute load
- Prevention: Use appropriate mounting intervals and quality hardware
Performance Issues
Poor Image Quality
- Cause: Screen surface irregularities or ambient light
- Solution: Improve screen mounting and lighting control
- Prevention: Use quality projection materials and proper room preparation
Inconsistent Ball Response
- Cause: Uneven screen tension or backing material issues
- Solution: Adjust tensioning and add consistent backing
- Prevention: Regular maintenance and quality materials
Future Expansion Possibilities
Technology Integration Readiness
Smart Home Integration
Design the enclosure with conduit and wiring provisions for future technology upgrades including automated lighting, climate control, and entertainment systems.
Launch Monitor Compatibility
Ensure the structure accommodates various launch monitor types and mounting requirements for future equipment upgrades.
Multi-Use Adaptability
Seasonal Modifications
Consider removable panels or convertible sections that allow the space to serve other purposes during off-seasons or when not in use for golf.
Family Entertainment Center
The projection and sound systems can serve double duty for movies, gaming, and other entertainment when golf equipment is stored away.
Conclusion
Building a professional-quality DIY golf simulator enclosure represents one of the most rewarding home improvement projects for golf enthusiasts. With proper planning, quality materials, and attention to detail, the result rivals commercial installations at a fraction of the cost.
The key to success lies in thorough preparation, quality construction techniques, and attention to professional finishing details. Start with a solid foundation, invest in quality impact screens and projection surfaces, and don’t compromise on structural integrity.
Your next steps should include:
- Measure your available space and create detailed plans
- Source quality materials from reputable suppliers
- Begin with the structural frame and build systematically
- Test and adjust each component before final installation
- Plan for future upgrades and technology integration
Remember that this project is an investment in both your golf game and your property value. Take time to build it right, and you’ll enjoy years of professional-quality practice and entertainment in the comfort of your own home.