DIY Golf Simulator Enclosure: Step-by-Step Plans for a Pro-Quality Setup
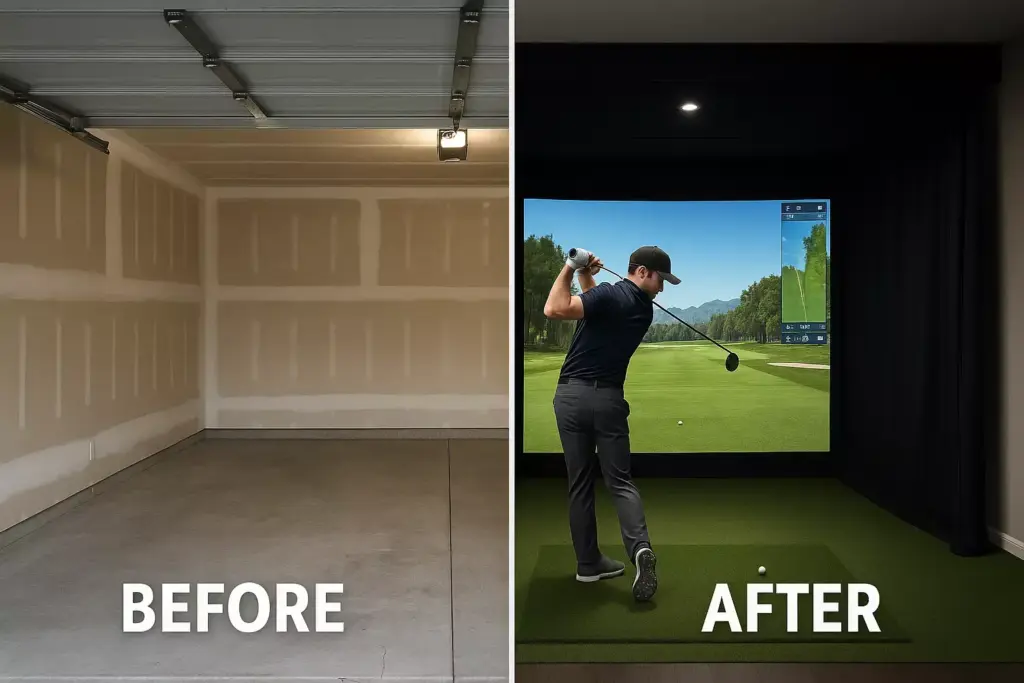
Imagine stepping into your own garage or basement and finding yourself on the 18th tee at Pebble Beach, complete with ocean views and championship-level pressure. Building a DIY golf simulator enclosure transforms this dream into reality, offering year-round practice opportunities without the hefty price tag of commercial installations. With the right materials, careful planning, and weekend dedication, golfers can create a professional-grade simulator space that rivals expensive commercial setups at a fraction of the cost.
Key Takeaways
- Budget-conscious approach: Building your own enclosure costs 60-70% less than professional installation
- Customizable dimensions: Tailor the space to fit your room size and swing requirements
- Essential components: Focus on impact screen, frame structure, netting, and proper lighting
- Safety first: Proper netting and padding prevent equipment damage and injury
- Professional results: With quality materials and careful construction, DIY setups rival commercial installations
Understanding Golf Simulator Enclosure Basics
A golf simulator enclosure serves as the protective barrier between your swing and the surrounding room. This structure contains errant shots, protects walls and furniture, and creates an immersive playing environment. The enclosure typically consists of three main components: the impact screen where golf balls strike, side netting for lateral protection, and a sturdy frame to support everything.
Why Build Your Own Enclosure?
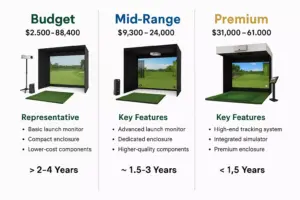
Commercial golf simulator installations often cost $15,000-$50,000, with enclosures representing 20-30% of that expense. DIY construction reduces costs dramatically while allowing complete customization for your space. Additionally, building your own enclosure provides:
- Complete control over materials and quality
- Custom sizing for unique room dimensions
- Upgrade flexibility as technology improves
- Satisfaction of creating something with your own hands
- Better understanding of maintenance and repairs
Planning Your Golf Simulator Space

Room Requirements and Measurements
Before purchasing materials, carefully assess your available space. The minimum recommended dimensions for a functional golf simulator are:
| Measurement | Minimum | Recommended | Optimal |
|---|---|---|---|
| Ceiling Height | 8.5 feet | 9.5 feet | 10+ feet |
| Width | 10 feet | 12 feet | 14+ feet |
| Depth | 12 feet | 15 feet | 18+ feet |
Pro Tip: Measure your tallest golfer’s swing arc plus 18 inches for safety clearance. Consider both backswing and follow-through when determining depth requirements.
Location Considerations
Choose a location that offers:
- Stable flooring capable of supporting frame weight
- Adequate ventilation for comfort during extended sessions
- Electrical access for projector, computer, and lighting
- Minimal foot traffic to avoid interruptions
- Sound isolation to prevent disturbing others
Essential Materials and Tools
Frame Materials
The enclosure frame forms the backbone of your setup. Galvanized steel EMT conduit provides the best balance of strength, cost, and workability:
Primary Frame Components:
- 1-inch EMT conduit (10-12 pieces, 10 feet each)
- EMT connectors and elbows
- Floor flanges for permanent installation
- Galvanized bolts and hardware
Alternative Materials:
- PVC pipe: Lighter weight, easier to work with, less durable
- Aluminum tubing: Lightweight and strong but more expensive
- Wood framing: Traditional approach, requires more tools and skills
Netting and Screen Materials
Impact Screen Options:
- Carl’s Place Impact Screen: Popular DIY choice, excellent durability
- TrueStrike Impact Screen: Premium option with superior image quality
- DIY Canvas: Budget-friendly but may affect image quality
Side Netting Specifications:
- #21 or #36 nylon netting: Professional-grade protection
- 10-foot height minimum: Protects against high shots
- Overlap installation: Prevents gaps that allow ball escape
Additional Supplies
Hardware and Accessories:
- Bungee cords for screen attachment
- Carabiners for easy netting removal
- Floor padding or artificial turf
- Cable management solutions
- LED lighting fixtures
Step-by-Step Construction Guide

Phase 1: Frame Assembly
Step 1: Create the Base Structure
Begin by assembling the rectangular base frame on the floor. Cut EMT conduit to your desired width (typically 12-14 feet) and depth (15-18 feet). Use EMT connectors to join pieces, ensuring all corners are square using a carpenter’s square.
Step 2: Install Vertical Supports
Attach vertical posts at each corner and at 4-foot intervals along the sides. These uprights should extend to your ceiling height minus 6 inches. Secure the base to the floor using appropriate anchors for your flooring type.
Step 3: Add the Top Frame
Connect the vertical posts with horizontal EMT pieces, creating a rectangular top frame. This structure will support the impact screen and provide attachment points for side netting.
Phase 2: Impact Screen Installation
Step 4: Mount Screen Hardware
Install mounting points for your impact screen along the front edge of the frame. Space mounting points every 2 feet to prevent sagging and ensure even tension across the screen surface.
Step 5: Hang and Tension the Screen
Attach the impact screen using bungee cords or grommets, starting from the center and working outward. Maintain consistent tension to prevent wrinkles that could affect ball bounce and image quality.
Phase 3: Side Netting Installation
Step 6: Measure and Cut Netting
Calculate netting requirements for both sides and the ceiling. Add 12 inches to each dimension for proper overlap and attachment. Cut netting sections using sharp scissors or a hot knife to prevent fraying.
Step 7: Attach Side Protection
Secure netting to the frame using carabiners or zip ties at 18-inch intervals. Ensure complete coverage from floor to ceiling, with special attention to corners where gaps commonly occur.
🏌️ Golf Simulator Enclosure Calculator
Safety Considerations and Best Practices
Structural Safety
Weight Distribution: Ensure your frame can handle the dynamic forces of golf ball impacts. A properly struck golf ball can generate over 2,000 pounds of force upon impact. Anchor points must be rated for at least 500 pounds each to prevent frame movement during use.
Netting Overlap: Install netting with minimum 6-inch overlaps at all seams. Use double-layer protection in high-impact areas, particularly behind the impact screen where most balls will strike.
Electrical Safety
Install GFCI-protected circuits for all electrical components within the enclosure. Keep all wiring at least 3 feet from the impact screen to prevent damage from errant shots. Consider using low-voltage LED lighting to reduce electrical hazards in the humid environment created by active golfers.
Lighting and Technology Integration
Optimal Lighting Setup
Proper lighting eliminates shadows that interfere with ball tracking and creates a professional atmosphere:
LED Strip Placement:
- Overhead strips running parallel to the impact screen
- Side lighting at 45-degree angles to eliminate shadows
- Adjustable brightness for different playing conditions
- Warm white temperature (3000K-4000K) for comfortable extended use
Projector Mounting
Ceiling Mount Considerations:
- Position projector 12-15 feet from impact screen
- Height clearance of at least 2 feet above tallest golfer
- Protective housing to prevent ball damage
- Cable management to keep wires away from swing area
Maintenance and Troubleshooting
Regular Maintenance Schedule
Weekly Tasks:
- Inspect netting for tears or loose connections
- Clean impact screen with appropriate cleaner
- Check frame stability and tighten connections
- Vacuum or sweep playing surface
Monthly Tasks:
- Deep clean all surfaces and equipment
- Calibrate launch monitor and projector alignment
- Inspect electrical connections and cables
- Test emergency stop procedures
Common Issues and Solutions
Screen Sagging: Retension bungee cords or add additional mounting points every 18 inches instead of 24 inches.
Ball Bounce-Back: Increase screen distance from wall or add padding behind the screen to absorb impact energy.
Netting Tears: Repair immediately with netting repair kits to prevent enlargement. Consider upgrading to heavier-grade netting in high-wear areas.
Budget Optimization Strategies
Phased Construction Approach
Phase 1 – Basic Structure ($800-1,200):
- EMT frame and basic netting
- Canvas impact screen
- Basic lighting
Phase 2 – Quality Upgrades ($400-800):
- Professional impact screen
- Upgraded netting material
- Improved lighting system
Phase 3 – Premium Features ($500-1,000):
- Sound dampening materials
- Climate control additions
- Advanced cable management
Money-Saving Tips
Buy in Bulk: Purchase EMT conduit and netting in larger quantities for better pricing. Many suppliers offer 10-15% discounts for bulk orders.
Seasonal Shopping: Buy materials during off-season months (late fall/winter) when demand is lower and prices drop.
DIY vs. Professional: Handle all assembly yourself but consider hiring professionals for electrical work to ensure safety and code compliance.
Advanced Customization Options
Sound Dampening
Acoustic Panels: Install sound-absorbing panels on walls and ceiling to reduce noise transmission to other areas of the home.
Flooring Solutions: Use rubber mats or artificial turf with padding underneath to minimize impact noise and provide realistic playing surfaces.
Climate Control
Ventilation Systems: Install exhaust fans to remove humidity and maintain comfortable temperatures during extended practice sessions.
Dehumidifiers: Prevent moisture buildup that can damage electronics and create uncomfortable playing conditions.
Conclusion
Building a DIY golf simulator enclosure represents one of the most rewarding projects for dedicated golfers. With careful planning, quality materials, and attention to detail, anyone can create a professional-grade practice facility that provides years of enjoyment and skill improvement. The key to success lies in proper measurement, structural integrity, and safety considerations throughout the construction process.
Start by accurately measuring your space and calculating material requirements using the provided guidelines. Focus on building a solid frame foundation, then add quality netting and impact screen materials. Remember that this project can be completed in phases, allowing you to spread costs over time while immediately enjoying a functional practice space.
Next Steps:
- Measure your space and finalize dimensions
- Calculate materials using the provided specifications
- Source quality components from reputable suppliers
- Begin with frame construction and work systematically through each phase
- Test thoroughly before full use to ensure safety and functionality
Your investment in time and materials will pay dividends in improved golf skills, year-round practice opportunities, and the satisfaction of creating something exceptional with your own hands.